Because dahlias are Mexican natives, they aren’t extraordinarily winter-hardy and won’t endure subfreezing temperatures. In cold weather, they will split, and in moist soil, they will begin to grow mold. Because of this, you must dig up your dahlia tubers and store them until spring; after all, indications of frost have disappeared. You can leave them on the ground if you reside in a warm region without freezing temperatures.
But don’t worry, you can replant the same tubers every spring, and they will last you for years if they are appropriately preserved. See below the procedures I took to store dahlia tubers for the winter.
How to Store Dahlia Tubers?
Proper Way of Storing Dahlia Tubers
Step 1
Dahlia tubers should be stored. When should I dig them up? You often must pull up your dahlias before the first harsh frost if you live in zones 7 (borderline) or colder. It’s a reliable sign that the time has come when the plant turns yellow and starts to die back, which typically happens in the late fall.
Just be careful not to dig them up too soon because the better the plant will be, the longer the roots can stay in the ground. In addition to healing, the plant can harvest and store energy for the following growing season. An occasional light frost is perfect.
Waiting till it freezes is one approach I’ve tried, and it’s worked well in my area. Meaning that before we experience the accurate freezing weather, there is typically a light frost that kills the dahlias. The tops were clipped, and I left them on the ground for a further week. It can then conserve energy for the following year. I then start from the ground and go through the listed steps.
Lucky you if you reside in a warm area where the earth doesn’t freeze, like the extreme Southeast or Southwest! Your dahlias can survive the winter underground and develop into perennial plants.
Step 2
Just a few inches above the ground cut the stems. Cut a few days before digging if you want the eyes to emerge, so the clumps are simpler to split. Just be sure to wrap the hollow stem in foil to keep water out, which could lead to rot and destroy the tubers.
Always dunk your scissors in a solution of one part bleach to ten parts water before switching from one plant to the next when cutting the stems and splitting the clumps (more below). By doing this, you can keep viruses from spreading throughout the plants.
Step 3
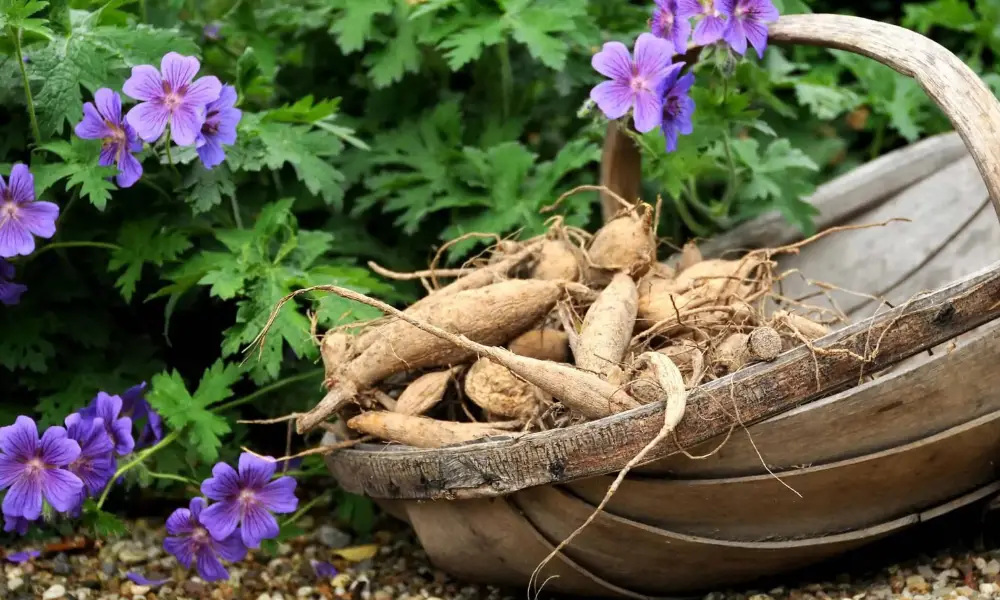
Carefully dig a foot around the plant’s main stem with a garden fork. Make careful you don’t damage any roots. Scoop up the cluster with a shovel or garden fork and carefully lift. Dahlia tubers’ necks are extremely delicate at this time, so you may wait a few hours for them to dry and stiffen before moving on.
Step 4
Wash the tubers in or with a hose after shaking off any extra dirt. Since dirt carries bacteria that are bad for storage, it should never be left behind. Remove any decaying components that could harm the remainder of the plant and other tubers.
Step 5
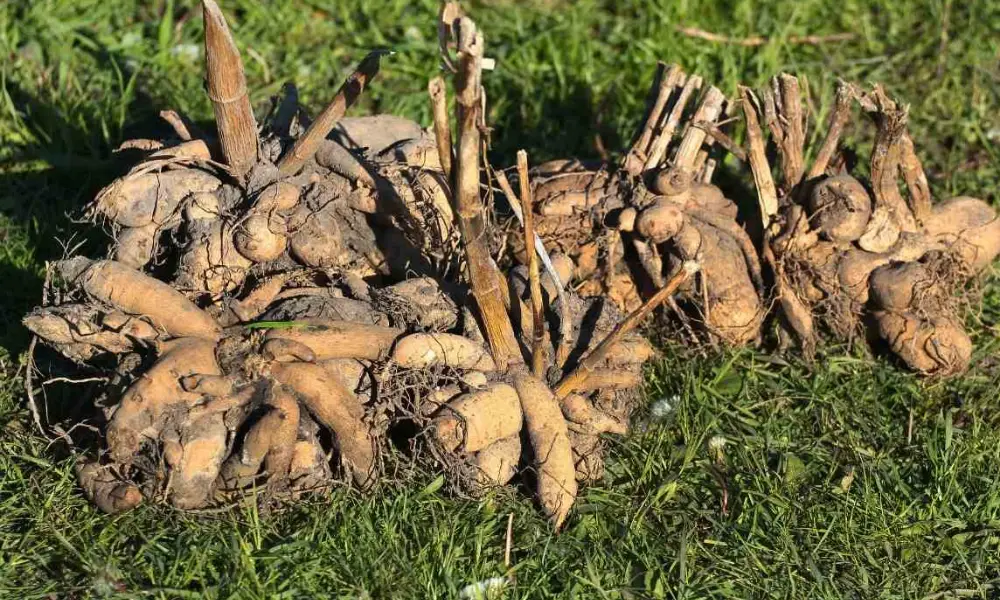
You can choose to divide the tubers now or in the spring before planting if they have multiple eyes. I’ve used both approaches. Choose what suits you the most. Use a sharp knife to separate if you must at this time. The cells that create the plants and flowers for the following season are known as a dahlia’s “eyes.” They resemble pimples almost precisely! Wait until the spring to divide your tubers if you can’t recognize them in the fall since they might be easier to see by then. I will often wait because of this.
Scrutinize the divisions as you cut the clumps, then discard the mother root. Remove every stem as well because they can cause crown rot—Rewash after cutting the divisions to get rid of any dirt that was missed.
Step 6
To cure mold issues, allow the tubers to dry for a few days or weeks before storing them. Place them to dry in an area with sufficient air circulation, indirect sunlight, and temperatures that won’t drop below freezing. They are dry enough when the skin begins to wrinkle.
Step 7
They are now prepared for storage! To keep them healthy until the following season, store them in a perfect, dry, enclosed space like a closet, attic, or unheated basement. Make sure the location isn’t prone to mold growth and dampness. 40 to 45 degrees F is optimal for storage.
The tubers should be put in crates, plastic containers, styrofoam, wood, or cardboard containers with coarse vermiculite separating the layers. Vermiculite could lose moisture if you use a wooden or cardboard box, and I’ve previously kept them in peat moss.
Use newspaper to line the container’s edges and keep the top tightly covered to keep the moisture in. Make sure the spaces between the tubers are adequately ventilated.
Winter is an excellent time to keep an eye out for any symptoms of rot on your tubers. Remove the impacted roots to prevent further damage.
When to Plant Dahlias Tubers?
When the earth is warm, and there is little possibility of a frost in the spring, Pabst advises planting dahlia tubers directly into the ground. Dahlias should be produced simultaneously as tomatoes, according to one sound recommendation.
This will happen in numerous places between April and May. However, people who live in warmer climates might begin the process a little early. It’s preferable to wait until the rain stops if there is a lot of rain.
Dahlia tubers can be started inside in bright light approximately a month before the period for outdoor planting if you want flowers as soon as possible, continues Pabst. Getting a head start, you can have a little plant prepared for transplanting in the spring.
But take your time planting your dahlia tubers outside. While it may be tempting to begin growing dahlias immediately, Nikita, owner of Mit City Farm, advises waiting until the earth has warmed up and all threats of frost have passed.
At least 60°F (15°C) should be the earth’s temperature. To determine the last average frost date in your growing zone, consult the USDA Plant Hardiness Zone Map.
How to Plant Dahlia Tubers in the Ground?
Establishing the ideal circumstances for dahlia tubers to flourish is crucial before putting them in the ground. Tammy Sons, horticultural and proprietor of Tennessee Nurseries, asserts that dahlias thrive best when grown in full sun and good, well-drained soil (opens in new tab).
Before planting, amend the soil with compost or other organic matter and mix it in to improve your chances of success. Sons continue, “For the greatest blooms and larger plants, use an all-purpose granular fertilizer.”
It’s crucial to sow dahlia tubers with the ‘eye’ facing up when planting them. The eye is the place on the shoulder or crown of the tuber from which the plant emerges.
Dahlia tubers should be buried 3–4 inches beneath the surface when planted in the ground. It would help if you typically planted dahlias 15 inches apart, depending on your kind.
However, more enormous dahlias could need to be spaced up to 30 inches apart, so check the final size of your preferred variety.
Add a stake or other plant support before you cover the dahlia tubers with soil to prevent later harming the tubers. Many dahlias can reach heights of 4-5 feet or even more, and the wind can easily snap their stems.
Before giving the dirt a good watering, backfill the planting hole with soil and compact it. Don’t water again until the green shoots grow unless the soil completely dries up; otherwise, the tubers risk rotting.
In a few weeks, the dahlias should start to sprout. Pinch out the growing tips to promote branching until they are 8 to 12 inches tall and have three pairs of leaves. A bushier plant with more flowers will result from doing this.
Use clean, sharp pruners to cut 3–4 inches from the top of each set of leaves to do this.
Are Dahlia Tubers Soaked Before Planting?
Dahlia tubers don’t need to be soaked before planting. However, some gardeners decide to wash them to hasten the growth process and rehydrate them after storage.
If you soak your dahlia tubers before planting them in pots, they’ll grow more swiftly and be prepared to bloom sooner, advises Nikita. Before planting, soak tubers for an hour in a basin of lukewarm water to adequately rehydrate them.
She cautions against using the hose excessively after the initial bath and planting. “While the plant is developing roots, wait until the earth is parched before watering again. If the soil is excessively wet before the roots and top growth get off to a strong start, the tubers won’t dry out, but they might decompose.
How to Take Care of Dahlias Tubers?
Watering
Dahlias prefer moist soil. When there is a drought, please give them a substantial flood, not a light mist, once a week. When there is a drought, water your dahlias daily if they are in pots. These plants are thirsty.
Fertilizing
Use a delayed-release fertilizer if your dahlias are in pots, or feed them every two weeks with liquid comfrey or seaweed fertilizer. Begin following the first month.
Staking
Every dahlia plant needs to be grown next to a stake. Be sure to keep tying the dahlias every few weeks. If not firmly anchored, dahlias can easily break off at the base in wind or rain once they start to grow.
Deadheading
Dahlias require routine deadheading, which will encourage flowering if you don’t pick every flower for the house. Follow the blossom stem downward and cut above the first set of leaves you come across to deadhead.
Propagating
Basal cuttings make it simple to propagate dahlias. Pick full, vigorous shoots around 7.5 cm long in the spring when the tuber has begun to sprout. Take them out with a clean, sharp knife and a little of the parent.
Pinch out the tip and remove everything but the top pair of leaves.
- Prepare a 1-liter pot with a compost and grit mixture (3 parts compost to 1 part grit). Each cutting should be placed near the pot’s edge, with the leaves spaced so that they do not touch and slightly over the compost’s surface.
- The compost will sink with water from above. Place the plant next in a warm location or a heated propagator that is well-lit but not in direct sunshine. Make a pot label.
- The cuttings will have developed roots in approximately 3 to 4 weeks. Carefully plant each cutting into a 7.5 cm (3 in) pot so that it may continue to grow before being planted outside when the risk of frost has passed.
- The plants developed from cuttings will flower later that summer and produce tubers with consistent feeding and watering.
Conclusion
To reduce issues, carefully dig up your tubers and prepare them for winter storage. Mold and rot are significantly reduced when the tubers are cleaned and dried before storage. This demonstrates how prevention is crucial and far more straightforward than problem-solving after the fact.
Start by removing all of the stems a few inches above the bloated, meaty tuber of the dahlia. With your fingers, remove as much of the soil from the tubers and roots as you can without breaking or harming them. Use your garden hose to rinse out any residual dirt gently. For planting the following spring, divide or separate large clumps into smaller ones. Lastly, place the freshly cleaned tubers in the sun for a few days or weeks to cure.