To overwinter canna bulbs properly, dig them up after the first killing frost of fall. To do this, dig a deep hole to reach underneath the bulb and lift it out of the ground. Remove any soil from the bulb and place it in a bucket. Wait two to three weeks before moving the bulbs. If you have a bucket, line the bottom with newspaper, then place the bulbs in it.
A great approach to guarantee that these plants with a tropical appearance remain in your yard year after year is to winter canna bulbs. Canna bulbs can be stored easily and quickly by anyone. Learn how to preserve your garden’s canna bulbs by reading on.
Cleaning Cannas for Storage of Canna Bulb
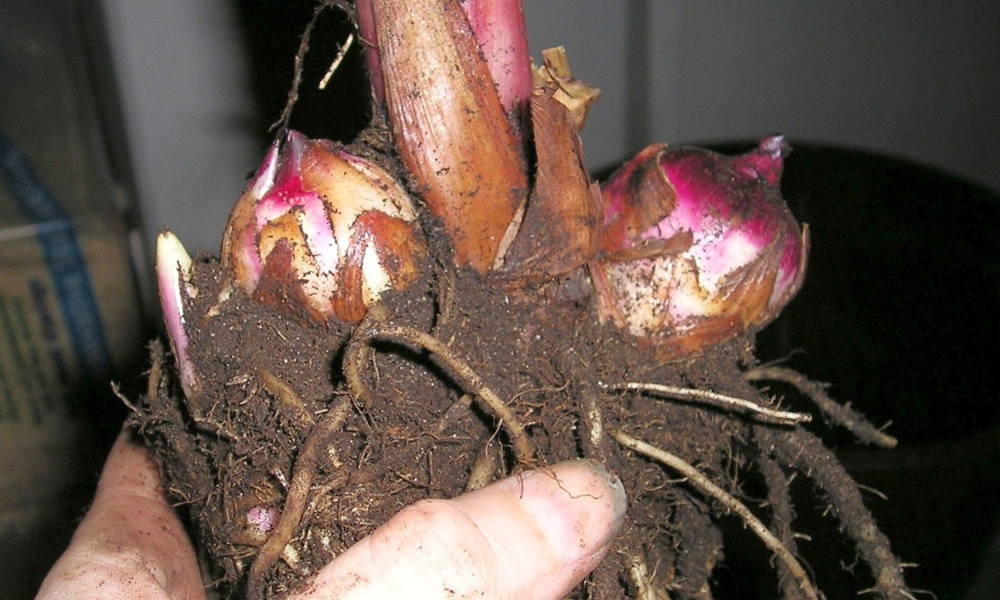
Lifting the canna bulbs off the ground is the first step in storing them. Wait until after a frost has died off the foliage before digging the cannas. Dig around the canna bulbs carefully when the foliage has died. It would help if you started digging a little more away from where you initially planted the canna because canna bulbs can grow quite quickly over the summer. If necessary, dig the canna bulbs out of the ground and divide them.
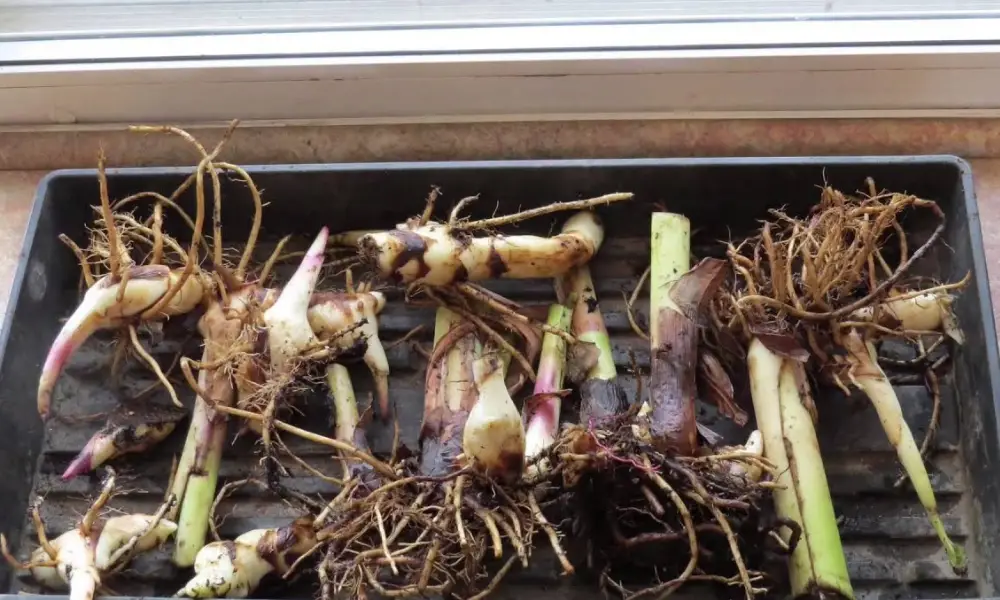
The leaves should be reduced to two to three inches for canna bulbs to be stored (5-8 cm.). Then use a gentle wash to remove the dirt from the bulbs; do not scrub them. Scrubbing can leave tiny scratches on the bulbs’ skin, making them more susceptible to decay and illness.
After the canna bulbs have been cleaned, you can cure them to prepare them for canna bulb storage. Place the bulbs in a dry location for a few days, such as a garage or a closet, to cure them. Curing helps prevent rot by toughening up the skin of the bulbs.
How to Keep Cannabis Bulb?
You can preserve the canna bulbs once they have healed. Either wrap them in newspaper or paper bags. Canna bulbs should be kept in a cold, dry location like a garage, cellar, or closet. If you have enough space, you can keep canna bulbs in the refrigerator’s crisper drawer. Check your canna bulbs once a month over the winter and eliminate any that look like they might be starting to decay. If you see that more than a few of the canna bulbs are rotting, you might wish to choose a drier storage location.
What are Various Types of Cannas?
There are numerous distinct cultivars of canna lilies, and each one has special qualities of its own. While some are admired for their vividly colored or unusually patterned flowers, others have colorful or variegated leaves.
It’s a lot of fun to mix and match various types of flowers and greenery because they both come in a range of hues and combinations.
Anyone’s attention would be captured by the foliage alone; it’s like a work of art. In wide varieties, the flowers and foliage contrast strikingly.
Madame Butterfly is of the shorter type, only reaching a height of 3-6 feet. The enormous salmon-pink blossoms sway and are elegant.
Bengal Tiger: The 4-6 foot tall, variegated foliage contrasts sharply with the bright orange blossoms.
Tropicana: This plant has amazing multicolored, striped foliage that is green and purple and is matched by orange blossoms. Grows to a height of 4-6 feet on average.
(Canna indica) Indian Shot The delicate, slender petals of the reddish-orange blooms with their golden edges stand out against the bright green leaves. It can reach heights of 3 to 8 feet.
Stuttgart is well-known for its exquisite, pale coral-pink blossoms and lovely white and green leaves. One of the taller types, standing 6 to 8 feet tall.
When to Plant Cannas Bulbs?
Once the soil has warmed up in the spring, canna lily bulbs can be planted in the garden. If you reside in a frigid climate with a limited growing season, start them in pots in late winter or early spring.
It is better to wait until there are no longer any chances of frost before putting them in the ground. If you plant them too soon, a late frost could harm them, or the bulbs could perish in the chilly, soggy soil.
Should Canna Bulbs be Soaked Before Planting?
Since I frequently receive this query, I thought I’d respond to it here. It’s not necessary to soak canna bulbs before planting them.
However, bathing them for 12 to 24 hours might make dormancy break quicker. To give them an even bigger boost, experiment with a little fish emulsion or compost tea in the water before soaking the items.
How to Plant Cannas Bulbs?
Planting canna flower bulbs is really simple. Most of them would develop well if you dumped the rhizomes into a hole and covered them with dirt.
However, you should probably be a little more deliberate than that. The bulbs should be inserted into the hole with their pointed ends facing upward or outward.
You don’t need to use extreme caution here. They will recognize which way is up even if you don’t put them exactly.
Canna Bulbs: How Deep to Plant them?
The ideal depth to plant them at is two to three times the size of the bulb. Avoid planting them too deeply, or they might not take root.
Therefore, it is recommended to plant larger bulbs deeper than smaller ones. You can layer them or stretch them out slightly if you’d like.
The size of the bulb was the standard for many years. For instance, a bulb two inches tall must be buried at least six inches deep. Deeper isn’t better, though, as an ongoing study at Cornell University’s Horticultural Department has demonstrated. Tulip bulbs planted in the Cornell test fields at a depth of just three inches and covered with a couple of inches of mulch fared better in subsequent years than those planted at a deeper depth. This is fantastic news for Cape gardeners because, in many gardens, clean and can be found six inches or deeper. Your bulbs should be alright if you cover them with three to four inches of dirt.
How to Separate Cannas Bulbs?
One of Australia’s least utilized plants must be the canna. They produce a kaleidoscope of colors, are as durable as worn-out boots, and require little upkeep.
The Canna musifolia was the source of the contemporary cannas. Simply put, “Musifolia” indicates it has leaves that resemble banana leaves. Hybridizers have bred new plants from these. Every bloom produces seed heads and seeds. The Spanish and Portuguese discovered the seeds in Central America, used them to construct rosary beads, and called them “Indian shot” because of how they resembled shot.
Cannas are challenging to grow from seed, and they can be multiplied most easily using division. You only need to dig up the canna, shake off the dirt, and separate the rhizomes. Usually, they are pretty simple to disassemble. The shoots that will create the new, luxuriant growth should be strong and healthy.
Prepare the ground just before planting. They prefer a lovely, sweet soil, so scatter some dolomite over the surface and work it in before adding bone and blood. Additionally, remember to include some sulfate of potash because they require it. Good, rich soil with lots of potash is ideal for cannas.
A canna purchased from a retail nursery will only have the stems and none of the leaves. Spread the roots out evenly as you plant them in the hole. The roots shouldn’t be bundled together; if you bury them too deeply, they will decay. Cover the plant’s crown with earth, and don’t forget to water it.
Given the right circumstances, the first blossoms on a newly planted canna should appear in around six to eight weeks. They have a long flowering season because each spike produces two sets of blooms. Keep in mind that if kept in one location for too long, canna clumps can become extremely large. Every two years, divide them between making room for new cannas.
I enjoy mass-planting cannas in drifts so that there are wide swaths of color. Therefore, purchase some rhizomes and plant them in your garden for a stunning result.
What are the Basic Care a Canna Plant Need?
Fertilizer and water
For the canna to be healthy, the soil must not dry up and always be moist. They need weekly irrigation if cannas aren’t cultivated in or next to a pond. The top 6- to 8-inches of soil are moist by watering twice weekly and applying 1 inch of water at each irrigation. Mulch applied in a 2-inch layer aids in preserving soil moisture. During the summer growing season, water cannas once a month with a 10-10-10 soluble fertilizer, diluting about 3/4 teaspoons in each gallon of water.
Simple Care
Pests or diseases rarely harm canna lilies. Slugs may eat the foliage, but you can eliminate them by putting slug traps around the plants they are damaging. Canna doesn’t need to be pruned frequently. To enhance the beauty of the plant, you can prune away any dead leaves and flower stems as needed. When the foliage dies back in the fall in colder climates, you might need to dig up the roots of the cannabis plant because it cannot withstand temperatures below 40 degrees Fahrenheit. Before planting in the spring, store these in dry peat moss in a cool (40 to 50 degree) place indoors. Potted plants can be moved indoors for storage without having to be dug up first.
How do you Fix a Canna that Won’t Flower?
A canna lily’s failure to bloom may also be caused by excessive shade, a drought, overcrowding, or nutritional deficiencies. If canna does not receive enough sunlight, it will not bloom. Each day, canna lilies require at least six hours of direct sunlight. Additionally, canna lilies need continually moist soil. To avoid rots, the soil must drain well, but it must also retain moisture. Canna lilies will sacrifice their flowers to conserve moisture when under stress from dryness or insufficient watering.
This is also the situation if canna lilies are not receiving adequate nutrition. Plant cannas in full sun, provide consistent watering and treat plants twice during the growing season using a standard 10-10-10 fertilizer for the greatest blooms. Overcrowding is the most frequent cause of a canna plant without blossoms. Canna lilies thrive and spread swiftly when cultivated as perennials, and they may eventually choke to death. Cannabis plants won’t flower if they have to fight for sunlight, nutrients, or water. Divide canna plants every two to three years to keep them blooming, happy, and healthy.
Conclusion
To prevent bruising, place the canna bulbs in a dry area. The room temperature should be between 60 and 70 degrees Fahrenheit. During this time, check them regularly for signs of rot and damage. A spray bottle will do the trick. You should also remove the bulbs from their packing material and let them dry for a few days. It is important to remove the bulbs and keep them cool in the winter to avoid bruising.
The best way to overwinter cannas is to remove the leaves before the first frost. Brush off the dead leaves and discard them. Store cannas in damp soil or a brown paper bag. Make sure the rhizomes do not touch each other. Store them in a cool, dark area. If the rhizomes become shriveled, soak them in water for a day or two before placing them in storage.